Deploy Vaultwarden on Raspberry Pi behind Cloudflare
Alternative implementation of the Bitwarden server API written in Rust and compatible with upstream Bitwarden clients, perfect for self-hosted deployment where running the official resource-heavy service might not be ideal.
Above is the introduction of Vaultwarden from https://github.com/dani-garcia/vaultwarden. In other words, after deploying Vaultwarden server we can use the clients of Bitwarden, which supports all kinds of platform, to manage our passwords. This article would demonstrate deploying Vaultwarden on Raspberry Pi behind Cloudflare with additional security measures like Fail2Ban.
1. Pre-requisite
- A Raspberry Pi. A Raspberry Pi 3B is used for the demonstration.
- A Cloudflare account.
- A domain name. The domain name could be purchased from Cloudflare.
2. Install Vaultwarden Server
Considering the portability, the Docker container is chosen. Following the instructions to install Docker https://docs.docker.com/engine/install/debian/.
Instead of sudo docker, use docker command directly with the following commands,
sudo groupadd docker
sudo usermod -aG docker $USER
Download the latest version of Vaultwarden server and install it.
# Download
docker pull vaultwarden/server:latest
# Install
docker run -d \
-v /usr/local/bin/vaultwarden/:/data/ \
-p 127.0.0.1:8080:80 \
-e DATABASE_URL=/data/vaultwarden.db \
-e ROCKET_WORKERS=10
-e WEB_VAULT_ENABLED=true
-e LOG_FILE=/data/vwarden.log
-e LOG_LEVEL=true
-e EXTENDED_LOGGING=true
—name=vaultwarden \
—restart=always \
vaultwarden/server:latest
The command above means,
- The
/data/directory in Vaultwarden server container is mirrored to/usr/local/bin/vaultwarden/directory in the host, namely Raspberry Pi. - The port 80 of Vaultwarden server is mirrored to the port 8080 of the host.
- Enable web interface of Vaultwarden.
- Enable log with extended level and stored in
/data/directory. - Name the container as 'vaultwarden' and always restart if stopped.
Since Vaultwarden needs a TLS certificate, Nginx is used for reverse proxy and the Cloudflare Tunnel provides the TLS certificate.

Install Nginx with sudo apt install nginx. Copy the Nginx configuration from https://github.com/dani-garcia/vaultwarden/wiki/Proxy-examples. Rename it as “vaultwarden.conf”. Replace the “vaultwarden.example.tld” to the Domain name. Uncomment “ssl_certificate” and “ssl_certificate_key”, and replace the path with the path of the .pem files from Cloudflare.
- ssl_certificate could be downloaded from https://developers.cloudflare.com/ssl/static/origin_ca_rsa_root.pem.
- ssl_certificate_key could be generated following the instructions https://developers.cloudflare.com/ssl/origin-configuration/origin-ca.
Move the “vaultwarden.conf” to /etc/nginx/sites-enabled/, and reload Nginx with sudo systemctl reload nginx.service.
3. Configure the Cloudflare Service
-
Login Cloudflare account and select Zero Trust.
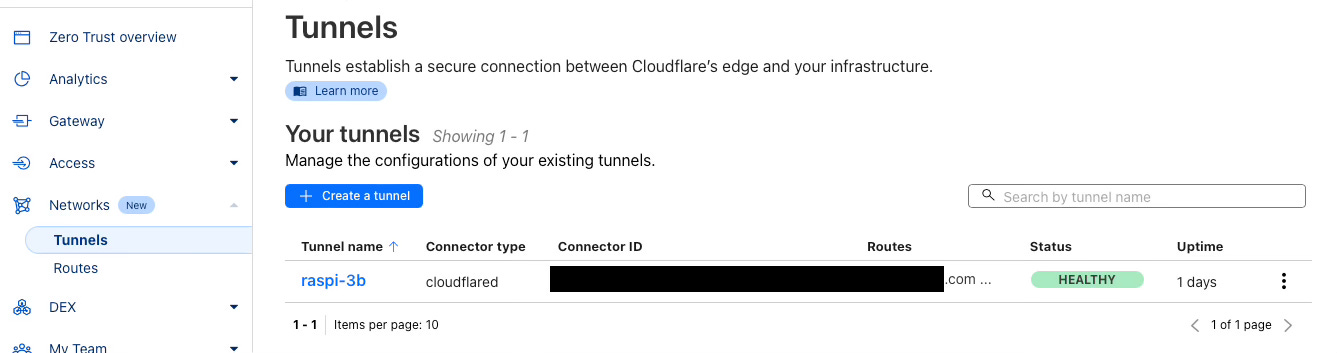
-
Create a tunnel using the recommended “Cloudflared”. Follow the instruction to install “Cloudflared” on Raspberry Pi. In Public Hostname, use the following configuration.
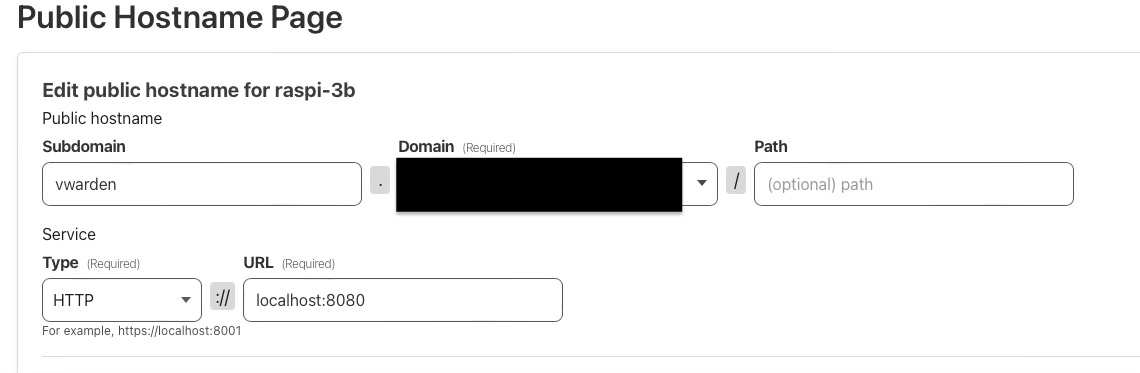
The Service Type must be HTTP, which means the communication between “Cloudflared” and the reverse proxy, Nginx, shall not be encrypted as HTTPS.
After this, Vaultwarden Server could be visited through the Public Hostname set above.
4. Enable the Admin for Vaultwarden
- Based on the prompt from Vaultwarden server, create an account.
- Create an Admin token with vaultwarden container,
	# Using the Bitwarden defaults
	docker exec -it vaultwarden /vaultwarden hash
-
Enable mobile client push notification by inserting the email address https://bitwarden.com/host/, and choosing US as the data region, to get the PUSH_INSTALLATION_ID and PUSH_INSTALLATION_KEY.
-
Remove the existed Vaultwarden container and reinstall the container with the commands below:
# Remove the existing container
docker stop vaultwarden
docker rm vaultwarden
# Install with admin token
docker run -d \
-v /usr/local/bin/vaultwarden/:/data/ \
-p 127.0.0.1:8080:80 \
-e DATABASE_URL=/data/vaultwarden.db \
-e ROCKET_WORKERS=4
-e WEB_VAULT_ENABLED=true
-e LOG_FILE=/data/vwarden.log
-e LOG_LEVEL=true
-e EXTENDED_LOGGING=true
-e SIGNUPS_ALLOWED=false
-e ADMIN_TOKEN=<TOKEN>
-e PUSH_ENABLED=true
-e PUSH_INSTALLATION_ID=<ID>
-e PUSH_INSTALLATION_KEY=<KEY>
-e TZ=Asia/Hong_Kong
—name=vaultwarden \
—restart=always \
vaultwarden/server:latest
Since “-e” means environment in Docker, which could be put in a env file like
vwarden.env, and the commands would be replace with--env-file=vwarden.env. -
Go to the Admin with https://domain/admin. Login with the token. Go to the Diagnostic tab, to see if there is any issues. If IP header is not Match, as the Cloudflare user, go to Settings -> Advanced settings, and set Client IP header to “CF-Connecting-IP”. After this, the Vaultwarden log would show the origin IPs of the visitors.
5. Install Vaultwarden Clients
The Vaultwarden uses Bitwarden clients. So install Bitwarden for phone and browser extensions. In the configuration, choose self-hosted with the domain name, and log in with the created account and password.
6. Add Security Measures
-
Enable two-step login
After logging in Vaultwarden Web, choose Account settings -> Security -> Two-setp login, and manage Authenticator app. After the setting, an additional 6-digit number is needed to logging in the account.
-
Add a Cloudflare Application for Vaultwarden Admin
Log in Cloudflare account. Go to Access -> Application, and create an application. In the overview, fill in the application domain with path “admin”. In Policies, add a policy including the email address. Leave the rest as default. So that every time logging in Vaultwarden Admin, the email address is needed to get a one-time code from Cloudflare.
-
Install Fail2Ban
The common tool to avoid brute attack is Fail2Ban, which could ban the visitors’ IPs if failed several times on logging in. Install Fail2Ban with the command
sudo apt install fail2ban.Following the instruction https://github.com/dani-garcia/vaultwarden/wiki/Fail2Ban-Setup
-
Create a filter and fill the following
# /etc/fail2ban/filter.d/vaultwarden.local [INCLUDES] before = common.conf [Definition] failregex = ^.*Username or password is incorrect\. Try again\. IP: <ADDR>\. Username:.*$ ignoreregex = -
Add a Cloudflare action for Cloudflare users
# /etc/fail2ban/action.d/cloudflare.local
[Init]
cftoken = <Global API KEY>
cfuser = <Email>
cftarget = ip
The Global API KEY could be found https://dash.cloudflare.com/profile/api-tokens.
-
Create a jail and fill the following
# /etc/fail2ban/jail.d/vaultwarden.local [vaultwarden] enabled = true port = 80,443,8080 filter = vaultwarden logpath = /usr/local/bin/vaulwarden/vwarden.log action = cloudflare iptables-allports maxretry = 3 findtime = 600 bantime = 600 -
Reload fail2ban with
sudo systemctl reload fail2banfor changes to take effect. -
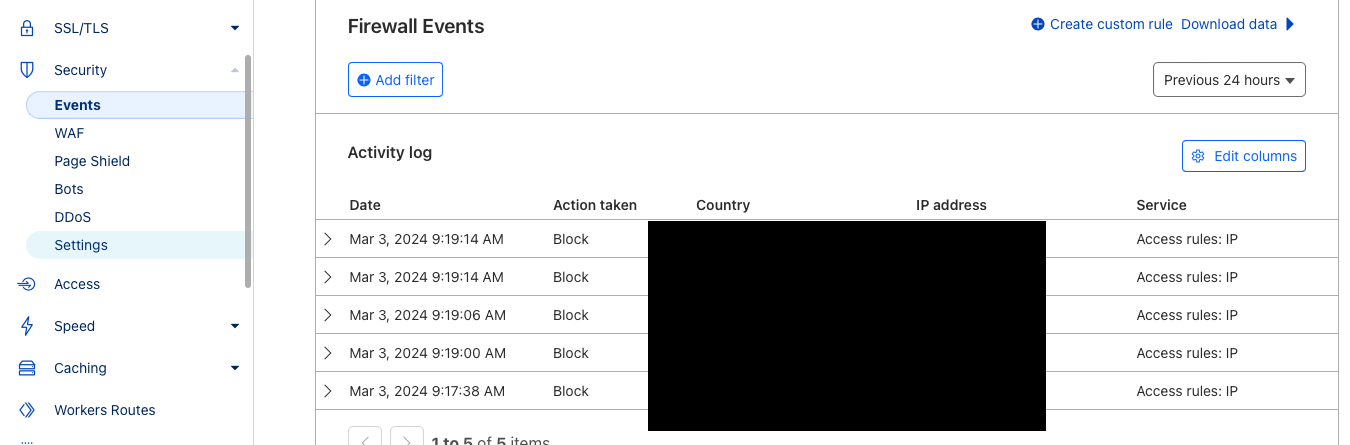
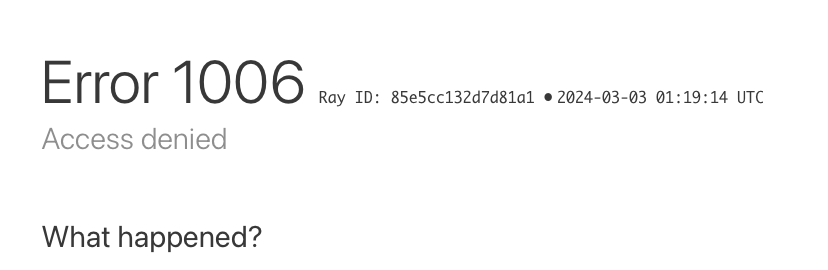
After 3 failed logins, the visitor's IP would be blocked by Cloudflare and the website would show like below.
-
7. Issues Met in the Process
- Fail2Ban could not find the logpath.
Execute commandsudo fail2ban status vaultwarden. If the File List is empty, like below, check the /etc/fail2ban/jail.local or similar file, inside which definesbackend = systemd. Delete or command this line and reload fail2ban, then retry the command.
Status for the jail: vaultwarden
|- Filter
|  |- Currently failed:	0
|  |- Total failed:	6
|  `- File list:
`\- Actions
   |- Currently banned:	0
   |- Total banned:	1
   `- Banned IP list:
-
The visitors' IPs are 172.17.0.1, which is the IP of the Docker.
As the Cloudflare user, login https://domain/admin with the admin token. Go to the Diagnostic tab, to see if there is any issues. If IP header is not Match, as the Cloudflare user, go to Settings -> Advanced settings, and set Client IP header to “CF-Connecting-IP”. Verify the IP header showing Match. -
The date or time does no match local date or time.
The time zone setting is not correct in Vaultwarden server. Reinstall the container with addition parameterTZ=Asia/Hong_Kong. -
The visitor's IP is banned by Fail2Ban, but is not blocked. The log of Fail2Ban is like below.
2024-03-03 09:58:11,815 fail2ban.utils          [6900]: ERROR   7fb80ddf70 -- returned 6
2024-03-03 09:58:21,897 fail2ban.utils          [6900]: ERROR   7fb80ddf70 -- exec: curl -s -o /dev/null -X POST -H 'X-Auth-Email: email' -H 'X-Auth-Key: token' -H 'Content-Type: application/json' \
-d '{"mode":"block","configuration":{"target":"ip","value":"xxx.xxx.xxx.xxx"},"notes":"Fail2Ban vaultwarden"}' \
https://api.cloudflare.com/client/v4/user/firewall/access_rules/rules
2024-03-03 09:58:21,898 fail2ban.utils          [6900]: ERROR   7fb80ddf70 -- returned 6
2024-03-03 09:58:21,900 fail2ban.actions        [6900]: ERROR   Failed to execute ban jail 'vaultwarden' action 'cloudflare' info 'ActionInfo({'ip': 'xxx.xxx.xxx.xx', 'family': 'inet4', 'fid': <function Actions.ActionInfo.<lambda> at 0x7fbbc32c00>, 'raw-ticket': <function Actions.ActionInfo.<lambda> at 0x7fbbc33380>})': Error banning 192.53.117.246
It seems the
curlcommand fails execution. Manually running thecurlcommand would add the IP to the blocklist of Cloudflare. Currently, it is an open issue for Cloudflare users from github and the solution is in working progress. https://github.com/fail2ban/fail2ban/issues/2318.
8. Reference
Self Hosting Bitwarden on the Raspberry Pi
https://github.com/dani-garcia/vaultwarden/wiki
Guide to routing to your Bitwarden Server via nginx reverse proxy
Using Fail2Ban with Cloudflare
This work by Joy-Lake is licensed under CC BY-NC-ND 4.0![]()
![]()
![]()
![]()